How to Build Cloud-Native Deployment Pipelines
The Tekton project is synonymous with cloud-native CI/CD.
Tekton, which is an integral part of the CD Foundation, is a capable and agile tool that provides Kubernetes-native components for dev tooling. Tekton allows developers to automate cloud-native deployment pipelines for all languages and frameworks. It can also integrate with other tools. Because it is open source, engineering teams can customize all aspects of the tool in order to maximize its potential.
Typically, we observe Tekton being used with or compared to Argo CD, Spinnaker and Jenkins X.
Being cloud-native implicitly requires the ability for tools to work with containers/Kubernetes and not be tethered to local configurations and dependencies. All components must be modular and developers should have the capability to spin up or tear them down at will, programmatically. This makes it a very natural choice for automating deployments that can make use of Paketo Buildpacks.
Buildpacks are used to create container images for applications from source. Each language or framework typically uses a corresponding Buildpack in order to transform code into an immutable artifact (in this case, an image). Paketo Buildpacks are an implementation of the open source Cloud Native Buildpacks project. Images built using Paketo Buildpacks are simple, secure and performant.


This tutorial will provide a functional example of using Paketo Buildpacks within Tekton pipelines. Based on this example, which makes use of a Java repo, other teams can choose different repositories (and Buildpacks) to build container images for apps of their choice.
For a basic understanding of Tekton pipelines, please read these excellent tutorials:
Getting Started with Tekton
Tekton – Getting Started
This particular tutorial will not go through the basics of Tekton, setting it up, adding the Tekton dashboard, etc. It is assumed that the reader is already familiar with these tools and has set them up to be functional.
Prerequisites
This tutorial assumes the availability of the following tools:
- kubectl
- Tekton CLI
- Tekton Dashboard
- A Kubernetes cluster
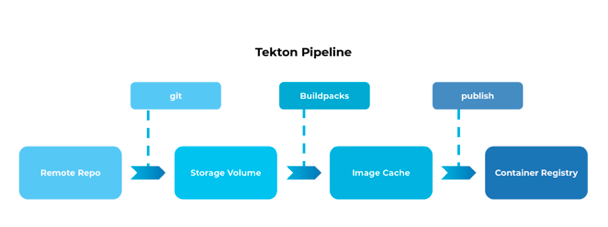
The goal of this tutorial is to familiarize the reader with the basic building blocks of Tekton and a cloud-native deployment pipeline. The tutorial begins with a sample code base available on GitHub. This code will be containerized and the image uploaded to a remote container registry (GitHub Container Registry). In order to transform the code into the image, we will be using Paketo Buildpacks.
1. Install the Buildpacks Tekton task. This task is developed and maintained by the Cloud-Native Buildpacks community. They have open sourced the repo here. Essentially, this task will allow you to pick up a codebase and use Buildpacks to generate an immutable container image.
kubectl apply -f https://raw.githubusercontent.com/tektoncd/catalog/master/task/buildpacks/0.1/buildpacks.yaml

task.tekton.dev/buildpacks created
2. Install the git clone task. This is also a ready-made Tekton task that allows code to be checked out from any remote repository. It makes use of certain parameters which will be supplied by further stages in the pipeline.
kubectl apply -f https://raw.githubusercontent.com/tektoncd/catalog/master/task/git-clone/0.2/git-clone.yaml

task.tekton.dev/git-clone created
3. Storage volumes. Two storage volumes are required during this process; one to store code repositories that are checked out of version control (in this case, GitHub), and the other to cache images that are exported from the build process before they are published to the container registry.
In order to do this, we will be using the following YAML file:
---

apiVersion: v1

kind: PersistentVolumeClaim

metadata:

name: buildpacks-source-pvc

spec:

accessModes:

- ReadWriteOnce

resources:

requests:

storage: 500Mi

---

apiVersion: v1

kind: PersistentVolumeClaim

metadata:

name: buildpacks-cache-pvc

spec:

accessModes:

- ReadWriteOnce

resources:

requests:

storage: 500Mi
Then, we will use the familiar kubectl apply command to create these resources for use by the Tekton pipeline.
kubectl apply -f res.yml

persistentvolumeclaim/buildpacks-source-pvc created

persistentvolumeclaim/buildpacks-cache-pvc created
Confirmation that the requested resources are created comes from the success message on the command line.
4. Authenticate with remote endpoints. At several points within the deployment pipeline, there may be a need for authenticating with remote endpoints. Service accounts tied to specific web services are used for authentication. These may be APIs, private repositories, or any other gated resource.
In this particular case, we will supply the credentials to a container registry (GitHub Container Registry) so that the output images will be published during the final steps of the deployment.
Creating the service account and providing the credentials, in the form of a secret, uses the same approach. A YAML file with the following declarative syntax is used:
apiVersion: v1

kind: Secret

metadata:

name: basic-user-pass

annotations:

tekton.dev/docker-0: https://ghcr.io

type: kubernetes.io/basic-auth

stringData:

username:

password:

---

apiVersion: v1

kind: ServiceAccount

metadata:

name: buildpacks-service-account

secrets:

- name: basic-user-pass
It is applied to the Kubernetes resource using the kubectl apply command. A confirmation message from the remote cluster indicates successful account creation.
kubectl apply -f auth.yml

secret/basic-user-pass created

serviceaccount/buildpacks-service-account created
5. Define the stages. A fourth YAML file defines what the successive stages of the pipeline would look like. Each stage within the pipeline is defined as a task. There are two tasks in this pipeline – the first clones the repository and the second does a build against this code.
The pipeline also makes use of certain resources which we defined in previous steps, namely – the storage volumes, authentication secret and container registry. The whole pipeline.yml file looks like this:
apiVersion: tekton.dev/v1alpha1

kind: PipelineResource

metadata:

name: buildpacks-app-image

spec:

type: image

params:

- name: url

value: ghcr.io/ramiyengar/test-tekton

---

apiVersion: tekton.dev/v1beta1

kind: Pipeline

metadata:

name: buildpacks-test-pipeline

spec:

workspaces:

- name: shared-workspace

resources:

- name: build-image

type: image

tasks:

- name: fetch-repository

taskRef:

name: git-clone

workspaces:

- name: output

workspace: shared-workspace

params:

- name: url

value: https://github.com/buildpacks/samples

- name: subdirectory

value: ""

- name: deleteExisting

value: "true"

- name: buildpacks

taskRef:

name: buildpacks

runAfter:

- fetch-repository

workspaces:

- name: source

workspace: shared-workspace

params:

- name: SOURCE_SUBPATH

value: 'apps/java-maven'

- name: BUILDER_IMAGE

value: 'paketobuildpacks/builder:base'

- name: CACHE

value: buildpacks-cache

resources:

outputs:

- name: image

resource: build-image
This pipeline is created on the Kubernetes cluster by using the kubectl apply command and supplying the pipeline.yml file as an argument.
kubectl apply -f pipeline.yml

pipelineresource.tekton.dev/buildpacks-app-image created

pipeline.tekton.dev/buildpacks-test-pipeline created
6. Kick off the automation process. Finally, the PipelineRun brings all of the different pieces together and kicks off the actual automation process. The PipelineRun is declared as a run.yml file, the contents of which are:
apiVersion: tekton.dev/v1beta1

kind: PipelineRun

metadata:

name: buildpacks-test-pipeline-run

spec:

serviceAccountName: buildpacks-service-account

pipelineRef:

name: buildpacks-test-pipeline

workspaces:

- name: shared-workspace

persistentvolumeclaim:

claimName: buildpacks-source-pvc

resources:

- name: build-image

resourceRef:

name: buildpacks-app-image

podTemplate:

volumes:

- name: buildpacks-cache

persistentVolumeClaim:

claimName: buildpacks-cache-pvc
To trigger the automation, apply the contents of the run.yml file to the Kubernetes resource.
kubectl apply -f run.yml

pipelinerun.tekton.dev/buildpacks-test-pipeline-run configured
Tools such as K9s can be used to inspect the Kubernetes cluster and examine the pods that are set up for each pipeline run.
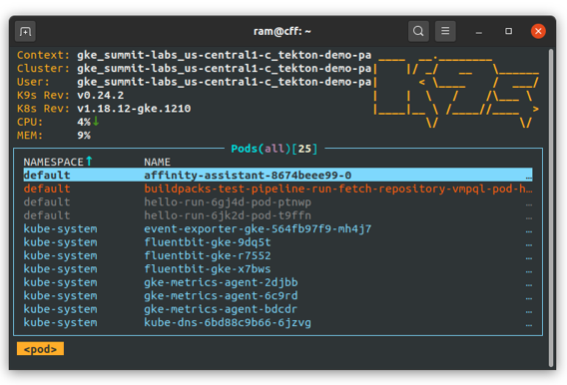
The logs within the pods are the best indicator of the outcome of the tasks, and should be the same as running the build process using Paketo Buildpacks on any machine. This provides a homogenous method to build applications and generate container images from them.
The use/reuse/abuse of Dockerfiles is most notable by its absence. One of the fundamental underpinnings of the Paketo project is to replace the use of Dockerfiles and have those directives placed within preset phases of Buildpack operations known as the life cycle.

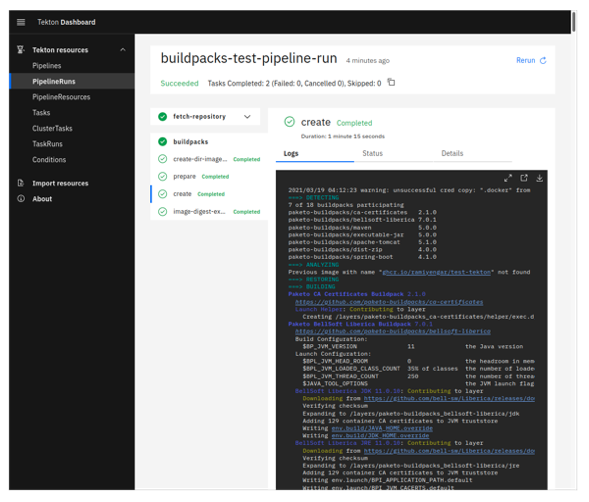
Alternatively, the Tekton dashboard can be used to monitor the progress of tasks and carry out common pipeline management needs. It provides a graphical way to execute common Tekton operations and helps replace the command line interface for certain needs.
If your current organization is using Kubernetes, then Tekton is a great way to build and maintain deployment automation pipelines. If you don’t use Kubernetes but are using containers, then Buildpacks are a great way to craft a technology strategy that can help you transition to Kubernetes-based infrastructure while also fitting into your present workflows.
The use of Tekton and Paketo buildpacks are also a great way for teams to leapfrog to the cloud-native paradigm and begin implementing modern application delivery and deployment practices. Teams of all sizes working with big or small software footprints can benefit greatly from the move to using cloud-native technologies.
If you would like to learn more about Paketo Buildpacks, please join us on Slack and start asking questions. You could also begin a walkthrough of our tutorial on paketo.io to see how easy it is to use Paketo Buildpacks to build your apps. For those interested in looking at the source code, the Paketo Buildpacks GitHub will show you all the cool tools we’re building.